BLOGGER TEMPLATES AND TWITTER BACKGROUNDS �
Showing posts with label diy. Show all posts

Monday, December 22, 2014

Christmas Movie Marathon/Hot Cocoa Bar Party and How to Age Your Own Wood!

Right before Halloween, I came up with this genius idea to put together a Halloween Movie Marathon party.  Unfortunately, the timing was off and the preparation didn't get far.  I loved the movie marathon idea and decided to plan a little bit further out and do a Christmas Movie Marathon party instead.

I wanted this party to be completely different than my last Ugly Christmas Sweater Party so I centered the theme around Hot Cocoa and Ugly Christmas Attire (I didn't want to limit everyone's creativity to just sweaters).  I sent out event invitations via Facebook and kept people up to date on fun things I was planning for the party.

For the Hot Cocoa/Dessert table, I used a plain red table cloth and dressed it up with a fabric garland from Michaels and some red and green ornaments from the Dollar Tree that were spread out on the table.  I used the two pine trees from my daughters Frozen birthday party on each side of the table and my vintage window as the backdrop and main focal piece.  I made a silver glitter Rudolph to place on the vintage window, so that it did not look so plain.

For the serving pieces, I had purchased a cute sled from a local shabby chic shop that I used to hold the hot cocoa mixes (milk chocolate and white chocolate) and the stir sticks for the hot cocoa (paper straws and candy canes).  The glass containers for the cocoa were both purchased at Michaels (use those 40% off coupons).  I also used a common piece from my parties, the wood cake stand from World Market to hold up a glass vase that held some brownie push pops.  For the filling of that vase, and to bring the table a bit more color, I purchased some green, red and silver decorative balls at Michaels.  I used some super cute milk bottles (see my DIY to make these on your own) to serve milk (with cute red and green paper straws from the Dollar Tree) along with some homemade sugar cookies, served on a tin platter from Michaels.  We had a large hot water carafe that we used for our last Christmas party that I wanted to be the centerpiece of the food/drink portion of the table.  To elevate that, I used a small wooden crate, from Michaels, and I stained it to make it look old and weathered (tutorial below).  For the hot cocoa toppings, I used a slab of wood, you guessed it, also from Michaels, and some festive sweater covered coffee/cocoa mugs from Target.  I filled each mug with toppings such as, dark chocolate chips, caramel bits, crushed Andies mints, french vanilla marshmallows, star and tree marshmallows and peppermint marshmallows.  In the center of the large slab of wood, I had some mini sleighs, that were meant to hold an individual cupcake, that I used to elevate some "ugly sweater" bowls that I used for the last Christmas party.  In those bowls were, whipped cream and marshmallow fluff.   I bought a simple, yet festive, tin at Michaels to put some styrofoam cups from the Dollar Tree.


For the food, everyone was asked to bring a dish to share.  We had cookies galore, meatballs and smokies in the crockpot, cheese and crackers, cream cheese dip, chips and salsa, and delicious ham and cheese sandwiches.

We asked everyone to dress in tacking Christmas attire.  Last party, we did ugly sweaters and this year, we didn't want to limit everyones creativity to just a sweater. There was a clear winner, Melinda, a good friend of ours had been harboring a Christmas dress that was by far the favorite of the night.  We spent the evening watching various Christmas movies and playing a game that involved a Santa hat, attached to the TV.  For this game, you take a Santa hat, attach it to the top corner of your TV.  Every time a character on TV gets in the position on the TV to where it looked like they are wearing the attached Santa hat, you take a drink (adult beverage or not).  Was a fun game and had the whole house yelling "HAT".

Over all, the party was very successful.  Everyone had a good time catching up and enjoying each others company.  Now on to planning the next party!  Stay tuned!

How to age wood with simple ingredients from home

You will need:

Large mason jar
Scissors
Steel wool
White vinegar
1/2 cup boiling water
2 tea bags (I used Lipton ice tea bags)
Clean paint brush
Non-treated wood project

In a large mason jar, place one piece of steel wool, cut into several little pieces.  Cover the steel wool completely with white vinegar and place the lid on the mason jar.  Let mixture sit at least 24 hours.   When 24 hours have passed, boil 1/2 cup of water.  Add 2 tea bags and allow to seep for 10 minutes.  When tea is done, using a clean paint brush, brush the entire surface of the wood with the tea mixture.  Allow to completely dry.  Once the tea is dry, use the steel wool as a brush and brush the tea stained wood with the steel wool/vinegar mixture.  You will begin to see it darken immediately, making it easy to see any missed spots.  You may leave it the way it is, or use a fine sander and sand very lightly over the aged wood.

Monday, December 1, 2014

DIY Milk Bottles

When I was planning a Mother's Day tea, milk bottles were nowhere to be found.  Unless you ordered them online, they were not available to me locally.  Now they are a bit easier to come by, but I found that a certain delicious drink resembled a milk bottle quite nicely.

Starbucks bottled frappuccino's are delicious and can easily be converted into a milk bottle for beverage serving at your next party!


First, empty out the bottle (of course by drinking it :) ).


Next, remove the label by soaking the bottle in hot water.

Finally, make sure any label residue is off and the bottle has been cleaned and you have yourself a milk bottle :)


Tuesday, January 10, 2012

Project of the day (or week)...Making a chocolate button

I have always found it very interesting that so much detail could go into decorating a cake or cupcake, but was always stumped on how to get perfect detail of say, a button.  A USMC, dress blues jacket button to be exact.  I have watched the cake shows until I was blue in the face but never dabbled in chocolate, let alone making my own chocolate mold.  I searched high and low on the Internet to find a silicone putty to make my own mold of this very detailed button that I wanted to go on the top of my hubbys going away party cupcakes.  I finally found this putty at Michael's and thought I would share my journey of chocolate mold making with you.

This putty I found is a food grade silicone that can be used for a numerous amount of things.  I found it in the polymer clay section at Michael's and it was around $20 (of course I used a 40% off coupon to cut the cost).

It is super easy to use and comes with two different tubs of silicone that when mixed, react the putties and allow them to cure.

The hubby had an extra button on hand and I was curious to try it out.  It was as easy as the box described and only took about 25 minutes for the putty to cure and the mold be usable. 

  
I ended up making six molds to cut the time it would take for me to make the 60 chocolate buttons I needed for the tops of the cupcakes.

I decided to try out one of the molds before I dove in to the 60 that I needed.  I used the white chocolate candy making chips that you buy in the candy making section of Michael's.  I had used the chips before and didn't have much luck but just thought it could have been my melting technique that didn't work.  Now that I know the proper microwave heating of chocolate is cooking it in 30 second intervals until completely melted, I decided to give the chips one more try.  Needless to say, it was not my melting technique, the chips just aren't high enough quality for this type of mold.  The chocolate was chunky and never completely melted to a smooth consistency.  I had to spread the chocolate like peanut butter into the molds.  It did give me an idea of how the mold worked and I decided to try another white chocolate I had used before.  I got some Baker's White Chocolate bars at the local grocery store and started again from the beginning.

This time, the Baker's white chocolate worked much better.  Cooking in the 30 second intervals worked perfectly and the chocolate was smooth and easy to fill the molds.  Each box (about $2.50 a box) had 6 individually wrapped squares and each square filled the 6 molds I had.  So I am getting about 36 buttons out of each box.

I filled each mold using just a custard dish to melt the chocolate, and a spoon to spoon the chocolate into the mold.  I had purchased a squeeze bottle to do that job, but figured the small amount of chocolate that I had to do at a time would cause more of a mess and cleanup in the bottle.

I put the filled molds in the freezer to cut down on hardening time.  After about 30 minutes, the chocolate was hardened and ready to come out of the molds.

They turned out great, but I noticed some small air bubbles in the chocolate.  They came out of the molds very easily and did not leave much residue in the mold.  I had to trim the edges a bit due to some overflow of the chocolate.  I tapped the other chocolate in the molds prior to putting them in the freezer to reduce the air bubbles in the rest of the batches.

I had decided that the way I was going to color the buttons to match the gold color of the buttons themselves was to use a drop of water, along with yellow food color gel and a bit of brown to make them as gold as possible.  I had tested this technique out on the chocolate button I had made with the icky white chocolate chips, as to not ruin any of the good chocolate buttons, and it seemed to work great.  After preparing to do the same on the good chocolate buttons, I noticed the gold food color was separating from the chocolate and it was not turning out like I had hoped.  My guess is the icky white chocolate was a dry chocolate and when it hardened, did not have much oil left in it.  Because of that, the color stuck to it better.

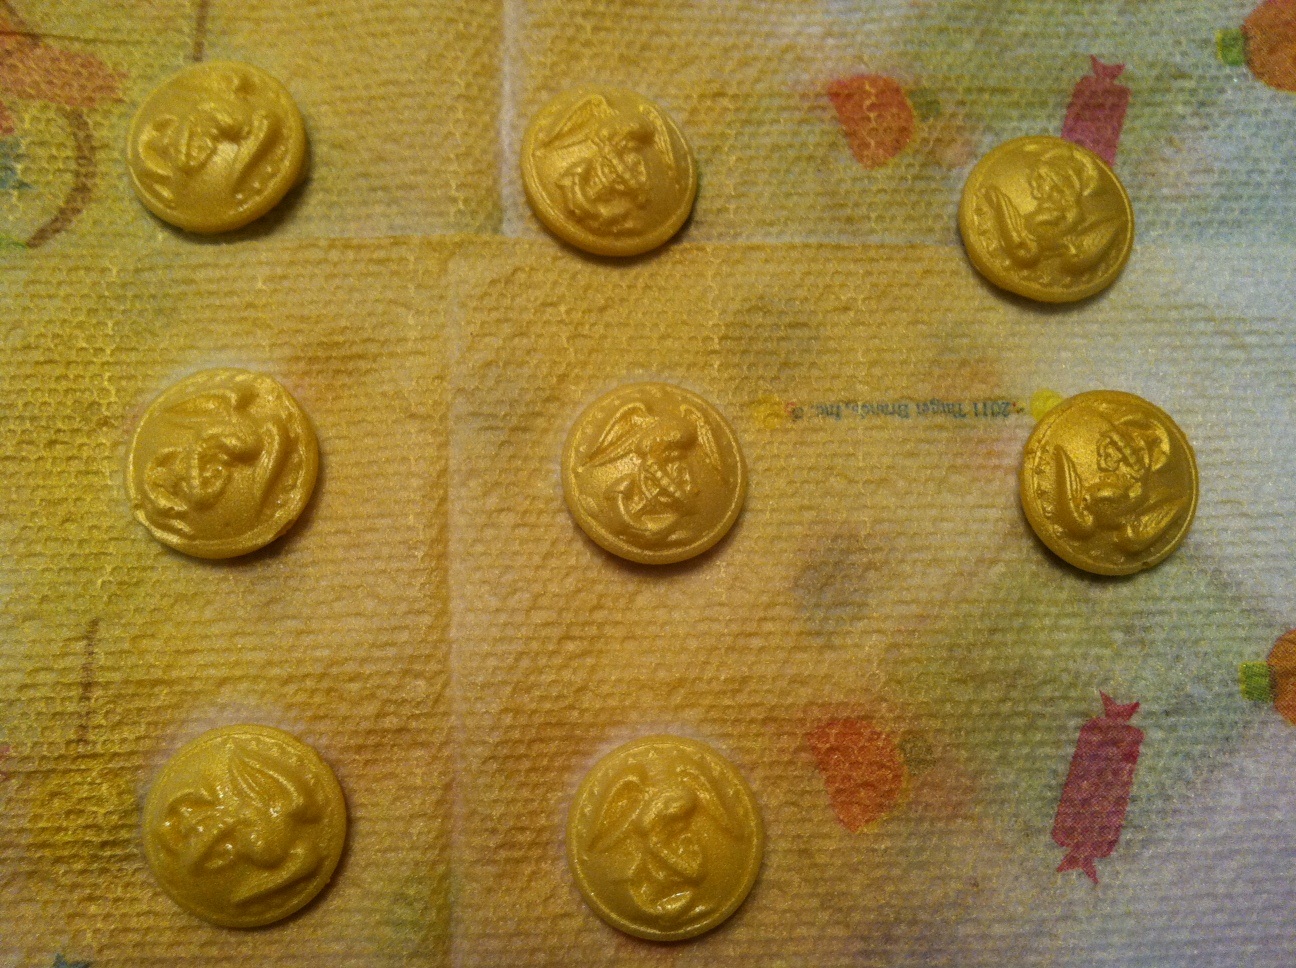
Having that technique fail, as well as not having much time to hand paint 60 chocolate buttons, I decided to move on the plan B, gold cake spray paint.  I had seen the Duff brand "Cake Graffiti" at Michael's, but didn't know if it came in gold.  Much to my luck, it did!!  I headed to Michael's and bought a can to try out.  I had seen some bad reviews so I wanted to try it out before I bought more than one can.  It ended up working wonderful and gave a much better gold color than the previous paint on technique I was going to use and saved a TON of time.

Here is the final button, painted and ready to top a cupcake.  Stay tuned next week to see how the cupcakes turned out with the pretty buttons on top :)


Lacey Cakes :)