BLOGGER TEMPLATES AND TWITTER BACKGROUNDS

Monday, December 1, 2014

DIY Milk Bottles

When I was planning a Mother's Day tea, milk bottles were nowhere to be found.  Unless you ordered them online, they were not available to me locally.  Now they are a bit easier to come by, but I found that a certain delicious drink resembled a milk bottle quite nicely.

Starbucks bottled frappuccino's are delicious and can easily be converted into a milk bottle for beverage serving at your next party!


First, empty out the bottle (of course by drinking it :) ).


Next, remove the label by soaking the bottle in hot water.

Finally, make sure any label residue is off and the bottle has been cleaned and you have yourself a milk bottle :)


Tuesday, November 4, 2014

Give Thanks. A Small, Yet Festive Thanksgiving Gathering.

Being a military family, it isn't often that Thansgiving gets to be shared with several family members. Last year was our last Thanksgiving (at least for a few years) that we were living in my hometown, surrounded by family. I wanted to make it special. Most importantly, I wanted to make it a time to make more memories with the people I care about the most. I put together a small, yet festive Thanksgiving gathering full of good food and good treats, but best of all, a whole lot of love. 


I have so many wonderful Thanksgiving memories and all of which include my grandma and grandpa. My grandpa passed away several years ago, but I still carry on some of the traditions that we all shared for many years. One in particular, and it may sound silly, was sitting at a long table so everyone was together. Every year we spent with my grandparents for Thanksgiving, I always requested a long table. For last years Thanksgiving, which was also the second time I have ever hosted a Thanksgiving gathering, I kept it simple, but had to have the long table! 


I put two 6 foot folding tables together with an extra long white table cloth and a burlap table runner (burlap and Thanksgiving were just meant to be, in my opinion). I placed little pumpkins, fall leaves and mini pinecones down the length of the table runner and placed some nuts and black olives in the middle of the table for snacking. My favorite part were the placemats. So simple, fun and interactive. I took several paper bags from the grocery store, cut them to the size of a normal placemat and hand wrote "I am thankful for" with several lines to write what you were thankful for that year. I used simple white plates with paper napkins and used silver, plastic utensils, tied together with brown ribbon. My "long table" looked so festive and most of all, reminded me of some of my fondest memories. 


For the dessert table, I used my burlap table cloth, decorated it with gourds, fall leaves, dried corn cobs and mini pinecones. For the backdrop, I used a roll of "weathered wood" paper from the teacher section at Michael's and cut it to the size I liked. I made a simple "Give Thanks" banner our of the same brown paper bags I used for the placemats and brown ribbon. To display the desserts, I had some amazing wooden cake stands I had purchased from Pick Your Plum (if you haven't checked them out, i highly suggest you do so - www.pickyourplum.com) that went with the rest of the decor perfectly. As for the desserts, I made a banana cream pie (recipe below), apple pie, mini pumpkin pies, pumpkin bundt cake and sugar cookies (see the sugar cookie recipe in this previous post ) that looked like pumpkin pie slices. All of the desserts turned out perfectly and were a lovely variety after the big feast.


For the meal, we made the typical Thanksgiving foods. Along with the long table, a lot of memories I have of Thanksgiving come from my grandparents spending hours in the kitchen making sure the food was perfect (and it always was).  We made both a turkey and a ham, mashed potatoes, twice baked sweet potatoes, stuffing, and cranberry salad. All of which were delicious. 

Thanksgiving is one of my favorite holidays, not because of the good food, but because of the amazing memories made. My goal is to create moments that my daughter will carry with her, just as I have!  Happy Thanksgiving and I hope this little bit of inspiration will help you build memories with your loved ones as well. 

Banana Cream Pie

Ingredients

1 box of vanilla wafer cookies
1/2 cup butter, melted
1 small 3.4oz package of instant vanilla pudding 
2 cups cold milk
2-3 bananas, sliced
1 8oz tub of CoolWhip, thawed

Preheat the oven to 350*. To prepare the crust, crush 2 1/2 cups of vanilla wafer cookies, place them in a medium bowl. Melt 1/2 cup butter and mix with the crushed vanilla wafer cookies. Press mixture in standard pie pan and bake for 10 minutes. Let fully cool before filling. 

While pie crust is baking, prepare pudding by mixing instant pudding with cold milk in medium bowl. Whisk for 3 minutes, set aside. 

When crust is fully cooled, arrange half of the sliced bananas over the bottom of the crust. Then spread 1/3 of the pudding over the bananas, followed by a layer of vanilla wafer cookies. Next spread 1/3 more pudding then a layer of the remaining banana slices and one more layer of remaining pudding. Spread CoolWhip evenly on the top of the pie and decorate with more vanilla wafer cookies, if desired. (From the bottom up, layers should be: vanilla wafer cookie crust, bananas, pudding, vanilla wafer cookies, pudding, bananas, pudding, CoolWhip).

Refrigerate at least 4 hours, best if refrigerated over night. 


Tuesday, October 21, 2014

Halloween Party Supply Round-up!

When I plan my parties, the ideas usually start forming several months before.  People always wonder how I am able to throw these parties and what cost is involved.  Starting the planning process early really helps because it allows me to start to purchase items for the party ahead of time and little by little throughout the months leading up to the party.  It can get spendy, but I RARELY buy things that aren't on sale and dollar stores and thrift stores become my best friend.  If you use your imagination (and Pinterest), you can really make dollar store and thrift store finds come alive!

I wanted to put together a little list of some fun Halloween party supplies that are a STEAL!

The first few items are from the Dollar Tree.

Paper Straws- I have become obsessed with paper straws. They are so versatile and can be used in all sorts of things, from cake pops and marshmallow pops to their purpose of drinking through them.  I can safely say I have them in almost every color imaginable, until I saw the Halloween straws at the Dollar Tree.  They come in several different designs and are, you guessed it, $1 for 15.


Creepy Cloth- This is one of my Halloween go-to's for making my decor just a bit more spooky.  Last year, I used about 2 dozen different colored creepy cloths throughout my garage and it gave it such a neat feel.  The good thing about these only being a dollar, you can cut them up, rip them, stretch them, anything you really want to make them looked well worn and either save them for next year or toss them without worrying about a ton of money down the drain (I save mine).  This year, I used several recycled cloths on my mantel, then placed my decor on top of them.

Spider Webs- These can get quite tricky, but for a creepy party atmosphere, they are a must.  Along with my creepy cloth, spider webs were everywhere at my Halloween party.  They covered any spot that could be covered and gave it the abandoned feel I was going for!

The next item is from H&M

This fun cake stand is so inexpensive and can not only be used for a Halloween party, but for many other things.  At $9.95, it is a steal, BUT, sign up for H&M's emails and receive an additional 20% off of one item!

This item is from Party City

This is a large, plastic cauldron for $9.99.  They only have the medium available online, but I purchased mine in store.  This cauldron was used to keep drinks at our Halloween party.  Fill it with ice and it will keep your drinks nice and cold in a fun, decorative way.  This year, I placed in it front of my fireplace as an added extra to my Halloween decor.

Lastly, never forget to check out your local thrift stores.

Whenever I want to find unique items that cannot be found at any other party, I scour the thrift stores. I have found some amazing things by taking several trips to different stores in my area.  Here are some things that I have found in my journey for creepy Halloween items.  My most recent addition was the old, vintage window.  I am using it amongst my Halloween decor, but am also going to be using it for an upcoming Christmas party I am planning.  Stay tuned for that :).

I hope this post gives you some fun inspiration to plan your upcoming Halloween party!  Until next time!

Thursday, October 16, 2014

Frozen in California, a FROZEN Birthday Party!

This year, my little girl turned 5.  Along with every other little girl, she was obsessed with Frozen!  It seemed only normal that her theme this year would be according to her obsession!

I had so much fun planning this party, because lets be honest, I liked the movie too.  I chose to go with the blue color from Elsa's Ice Queen dress as my main color scheme for the party.  The table cloths, backdrop, food, etc, all were based around this color.  I also incorporated snow, because you can't have a "Frozen" party without snow.


For the dessert table, I covered the table with a blue table cloth with an organza blue overlay to mimic Elsa's cape on her dress.  I then covered the entire top of the table with fake snow, mini snowballs made out of Dollar Store styrofoam balls, covered in white glitter and little battery operated lights to give it a gleam.  The main focus was a silver Manzanita tree that I draped with fishing line strung crystal beads to look like the scene from the movie where the characters meet Olaf for the first time, under the frozen willow tree.  I placed the tree on top of large square vase, turned upside down, on top of more snow, snowballs and lights, to look like a big ice cube.  I wanted to give the tree more lift, so there was no doubt that it was the focal point of the dessert table.  I then had a small pine tree and a small, white feather tree on both sides of the large Manzanita tree.  I found these awesome letters at Hobby Lobby that just so happened to be the same color as my scheme and knew I had to have them to spell out my daughters name in the background of the table.  For the backdrop, I found this great tutorial for paper snowflakes, made several in different blues and whites, and sizes and glued them to a simple, trifold poster board.  I love trifold poster boards for backdrops!  They make it so that with the folds, they easily stand up on their own with little anchoring, if any, needed.

For the desserts, I made vanilla "snowball" cake pops, "snowflake" sugar cookies (recipe below), "snowball" coconut macaroons, vanilla cupcakes with fondant snowflakes, and a cake to give homage to my favorite character, Sven from the movie.  As for the serving pieces, I made two "cake stands" from a clear plate and clear candle holder from the Dollar Tree, glued them together using the sturdy E3000 glue, then using my glue gun, I made a thick trim around the edge of the plate and sprinkled the undried glue with glitter, giving it a "snow drift" around the edge.  I also found some silver chargers at Michaels that I used to place the other desserts on.


For the food, we stuck with easy "subzero" sandwiches from a local sub shop (at the request of the birthday girl).  Along with the subs, we had "ice" chips, "Olaf noses" in ranch dressing, "Kristoff's Ice Blocks" jello and  "melted snow" water.


I put together cute gift bags for party favors with some things that fit within the color scheme and theme of the party.  On the front of the bags, I cut out clip art of the characters (Anna and Elsa for the girls and Sven and Olaf for the boys) and to make the ones for the girls even "girlier" I cut a small piece of matching tulle, and placed it over the character, like a 3D skirt.  For the girls, Michaels had some silver crowns that matched the theme perfectly, and I used some blue embellishments to dress them up a little more.  For the boys, I used this template and cut out antlers and glued them on to a band that was attached together by a small piece of elastic, to give it a bit of a stretch for different sizes of heads.  The kids all loved the "party hats".  The birthday girl also gave "Do you Want to Build a Snowman" kits with marshmallows, pretzel sicks, mini chocolate chips and candy corn, as well as a chocolate bar with a customized label to match the theme.

We had the party down at our neighborhood clubhouse/pool so the kids spent most of the time swimming.  I planned an indoor snowball fight, and made a bunch of yarn snowballs, some out of white yarn and some out of silver yarn, using this easy tutorial.  I kept the clubhouse doors closed and the AC on high so that the room gave the feel of colder weather.  I scattered more fake snow all over the ground and armed each child with a few yarn snowballs.  They had a blast, major highlight of the party.

Mostly, it was a time to gather with friends and celebrate Emma.  Everyone had a great time, and most importantly, the birthday girl loved it!  I hope you enjoyed this party as much as I did planning it!  Until next time!

Sweet Sugar Belle's Sugar Cookie Recipe

Ingredients

1 cup (2 sticks) of real, unsalted butter, softened
1 1/2 cups confectioner's sugar
1 egg
2-3 tsp flavoring (any kind, I prefer almond)
2 1/2-2 3/4 cups all-purpose flour
2 tsp baking powder
1 tsp salt

1.  Cream together softened butter and confectioner's sugar.  Crack the egg into a separate bowl and add the flavoring.  I use emulsions, but extract also works well.  Add that to the butter/sugar mixture and mix until the egg is thoroughly incorporated.  In a separate bowl, sift together the flour, baking powder and salt, then add, little by little to the wet mixture.  I can tell the dough is ready with most of it sticks to the paddle.  When I touch it, it has a little give, but does not stick to my fingers.

2.  Roll out on parchment to about 1/4 an inch thick, use flour for dusting as necessary.  Then, cut and bake at 400 degrees for 7-8 minutes.  This version makes 2-2 1/2 dozen.


Sweet Sugar Belle's Royal Icing Recipe

Ingredients

2 pounds (one bag) confectioner's sugar
5 Tbsp meringue powder
2-3 tsp oil-free extract or emulsion
1/2-3/4 cups warm water

1.  Begin by string the flavoring into half the water

2. Using a paddle attachment, gently mix the sugar and meringue power.  It's not necessary to sift the sugar beforehand, but you can if you like.

3. With the mixer on its lowest setting, slowly add the water/flavoring mix to the dry ingredients.  As the water is added, the icing will become thick and lumpy.

4.  Continue to add the remaining water (this may or may not be the entire amount) until the mixture reaches a thick, honey like consistency.  At this point, turn the mixer to medium speed and whip 2-4 minutes until the icing is thick and fluffy.  Mixing time can vary greatly, so watch carefully and stop mixing when the icing is thick enough to form soft peaks.


Wednesday, September 24, 2014

BOOOO! Halloween Party

There is no doubt that Halloween is one of my favorite holidays.  I don't know if it is because it kind of signifies the beginning of Fall for me, or if its the excitement everyone gets over dressing up and pretending to be something else for the day!  Last year, I was able to plan my first Halloween party and boy was it a good time.  I scoured Michaels, Hobby Lobby, Dollar Tree, Party City, thrift stores and every Halloween store in town to find the best decoration deals I could.

My husband and I decided we wanted to keep the party in the garage and have it be adults only.  This allowed us to get a little creepier with the decor and by having it in the garage, we could set it up ahead of time.  For this party, I stocked up on a TON of "creepy cloth" and cobwebs from the Dollar Tree.  I wanted the look of this party to be that of an old, abandoned house.

I brought in some small furniture (love seat, oversized chair, side table) from our house and used some patio chairs and rocking chairs from our front porch.  I covered each piece of furniture that was going to be sat in with a white sheet, giving it the abandoned house look.  All of my sheets were thrift store finds and were under $5 (sheets had to be large to fit over the furniture).

I hung the creepy cloth all over the garage, making sure to tear and stretch it to give it an authentic look.  Cobwebs went everywhere cobwebs could go, making it look as if the place hadn't been cleaned in decades.  I also put plastic rats, crows and a variety of bugs anywhere I could.  I had two small tables that I used to put little extras on, such as, spray painted black vases with black flowers, old candle holders, candelabras, creepy pictures in frames, old books and an old creepy telephone.  The room was lit just by tons of candles to give it yet another element of abandonedness.

I had purchased two animated dolls from our local Halloween store.  One little girl that sat on a swing that hung from the ceiling and hummed some creepy tune and one little girl that stood about 4ft high and looked like the girl from the Exorcist.  She too hummed a creepy tune and lunged at you when you least expected it.  I also invested in a small fog machine from Party City that took the party to a whole new level of scary!

A couple of thrift store dolls were given a makeover and turned into some creepy bystanders that
stared at you no matter where you were in the garage.  I was pretty proud of their scary makeovers.

For the dessert table, I covered the table with a black table cloth and spread moss over the top of the table.  I used a roll of "weathered wood" paper from Michaels to create the backdrop, along with a black mirror from Bed, Bath and Beyond and two scary pictures in frames from the Dollar Tree.  The focal point on the table was a huge candelabra from Michaels (use coupons,
it saves a TON) with matching black candles (also from Michaels).  I had two glass containers from another party that went on either side of the candelabra, filled with a skull and bones and more moss.  Of course, everything (besides the food) was also covered in cobwebs.

As for the desserts, I made carmel apples, using a Dollar Tree knife as the stick.  I also made red velvet cupcakes with cream cheese frosting and shards of "glass" made from drying a sugar syrup and breaking it into pieces.  I made a simple pistachio bundt cake and covered it with red
frosting to mimic blood and made marshmallow pops, stuck into a styrofoam skull.  Lastly, I made piƱata headstone cookies with mini m&m's inside and "bones" out of pretzels, mini marshmallows and white chocolate (tutorial shared below).


Marshmallow and Pretzel "Bones"


Ingredients:
1 Package of pretzel sticks
1 Package of mini marshmallows
1 Package of white chocolate (I use Baker's brand)

Take one pretzel stick and push a mini marshmallow onto each end.  Melt white chocolate on double broiler, until smooth.  You may also use a microwave by putting the white chocolate in a microwave safe bowl and heating at 30 second increments, stirring in between, until white chocolate is smooth.  Dip assembled pretzels into white chocolate and let dry on parchment paper.


This party was so much fun and everyone that attended loved it! We loved the decorations so much, we left them up for trick or treaters, some of which were scared to come into the garage.  We had people in our neighborhood giving us so many compliments and I can't wait until our next Halloween party!

Hope you enjoyed this party as much as we did.

Until next time,
Creative Details Event Planning.


Wednesday, September 17, 2014

Minnie Mouse or Bust

It is so hard to believe it has been so long since I have posted on here.  So many things have happened in the long year and a half since my last post.  We have recently relocated to the East Coast and are just getting settled in to our new place and new routines.  My one and only little one started kindergarten this year and I have been a ball of emotions to say the least.  The past year and a half have been nothing short of awesome and I have a ton of parties to share with you guys.  You may also notice the new name.  This month, I decided to take a bit of a turn in my focus.  I still LOVE cake and cupcake decorating, but I have decided party planning is more my passion.  I will still share my baking ideas but you will see more of my posts will be on party planning.  Over the course of the next month or so, I want to show you what I have been up to and I hope you guys enjoy :)

This post is dedicated to the loveliest mouse of all.  The one and only Minnie Mouse.  This was my daughters 4th birthday party theme last year (2013).  I started out only wanting to do a very small, "no big deal" party because we were spending a few days at Disneyland for Emma's actual birthday.  Who was I kidding, me do "no big deal"?  It just didn't happen that way, but it ended up super fun and most importantly, the birthday girl LOVED it and it was a magical way to begin our trip to the happiest place on earth.


We started the party out at our local beach where we enjoyed a nice BBQ with our friends and family and of course some fun in the sun!  After a couple hours and full bellies, we made our way back to our house to celebrate some more with cake and ice cream.

For the cake, I used the Wilton Giant Cupcake Pan, frosted the bottom with a pink, high humidity frosting to match the rest of the decor.  I then used the rose swirl technique to frost the top of the giant cupcake (tutorial coming soon).  I had previously made Minnie ears out of black fondant with spaghetti noodles at the picks to stick into the cake.  I also made a pretty pink bow and Disney font letters/number for "Emma" and "4", using Disney font I found online, printing off the letters/number I needed in the size needed, covering with wax paper, and using black fondant to outline the letters/number.


For the matching cupcakes, I made Minnie ears out of black fondant, using a small circle cutter and pink bows using a silicone mold I have.  I decorated each cupcake using the rose swirl technique and placed two ears on each cupcake with a bow in the middle. For the other cupcakes, I decorated them using the rose swirl technique and placed small, white ball candies on the tops to mimic Minnie's polka dots on her dress.


I also made Minnie shaped sugar cookies (will share the recipe in a later post) with coordinating frosting colors and chocolate dipped Minnie Oreo cookies.  I have had a TON of questions on how I made these Oreo cookies and they were quite simple.  Although I don't have process pics, I thought I would quickly share how they were made for all those how would like to make them as well.


Minne Mouse Oreo Cookies:

Ingredients:
1 package of double stuffed Oreo cookies
1 large package (or several little ones) of mini Oreo cookies
1 package of white chocolate, separate some for dying and a small amount to keep white (I used Bakers brand white chocolate)
Pink chocolate food coloring (yes there is a difference from regular food coloring, I will explain below)

Start out by disassembling the mini Oreo cookies, scraping the filling from the backs of either cookie,  so you have two mini cookies.  Then take one double stuffed Oreo and gently press both mini cookies into the filling of the double stuffed Oreo, making "ears".  You can also use some frosting or melted white chocolate to keep the "ears" secure, but I found that I didn't need it.  After you have assembled the Minnie Oreos, slowly melt white chocolate over a double broiler, until smooth.  You can also use the microwave to melt the chocolate.  Simply use a microwave safe bowl and heat the chocolate for 30 seconds at a time, stirring in between, until chocolate is smooth.  Then, using chocolate food coloring, dye the chocolate the desired color.  You must use chocolate food coloring due to the oil in the chocolate or your chocolate will not hold the color and separate.  I also use Flo-Coat by AmericColor to make sure my chocolate has that smooth consistency.

After your chocolate has reached your desired color, take each Oreo, being careful to keep the "ears" in place, and dip the bottom portion of your double stuffed Oreo half way in the chocolate.  Let dry on parchment paper.  While the chocolate is drying, you may also use some of the left over colored white chocolate to make a small bow between the "ears", using a small cake decorating tip (Wiltons round #2) in a decorating bag.

After the chocolate has dried, melt the remaining white chocolate to make the polka dots.  Use a small cake decorating tip (Wilton round #2), in a decorating bag, and fill it with the melted white chocolate, making sure it has cooled enough to handle, but not enough to begin to harden.  Make small polka dots on the colored white chocolate to mimic the polka dots on Minnie's dress.  Let dry and enjoy.

Hope you enjoyed this party as much as I did planning it.  I look forward to sharing more fun parties with you in the near future.

Until next time,
Creative Details Event Planning


Friday, April 5, 2013

Flirty 30

Hello again to my faithful followers, all 6 of them ;)  I have been a bit MIA lately.  I remember last year writing about one of my new years resolutions being to blog more...well that didn't go so well haha.  Maybe this year I can try it again (even though it is already 1/4 into the year and this is my first post :/ )

I recently celebrated a milestone birthday, the big 3-0.  I can't say that I was thrilled to let my 20's be a thing of the past, but it has proven to be okay so far.  I had originally planned this over the top, 50 Shades of Grey themed "dirty 30" birthday bash for myself.  Everyone was going to wear gray, have masquerade masks on and we were going to celebrate eating foods that reminded us of the books and the characters that made the book so interesting ;) Submissive Subs, Bow 'tie me up' pasta, red room of pain velvet cupcakes, vanilla cupcakes, soft limits taffy, hard limits candy, you get the point.  Well finally I decided, why am I throwing my own party and causing myself stress on my own birthday!?!?!  I called the party off and planned on just having a stress free, low key get together with friends and family. 

On the Saturday before my birthday, we had some friends visiting from out of town and my friend Jaime and I went to get our nails done.  My husband made the appt, which was a little odd, but I didn't think much of it.  When we got to the nail salon, the nail tech asked to look at my nails.  I wasn't quite sure why she needed to see my nails as I had planned on just getting a quick mani/pedi.  She kept pushing getting fake nails to make them longer because I am a biter :)  I had just taken a set off and my nails were still thin from it, so I didn't really want to damage them more.  Finally Jaime said that Todd insisted I get the fake set.  I text Todd asking why I had to get them, because this was MY birthday weekend :)  He told me to stop being difficult and to do what he said.  I had a nail color all picked out and the tech came out with a printed out nail design based on one of the 50 Shades book covers. 

From what I was told, we were going out to dinner as a family to celebrate my upcoming day.  I thought maybe he just wanted me to have a piece of the book I loved so much since I wasn't doing the big party.  After my nails were dry, the tech led me back to the waxing room.  My first thought was, OH GEEZ, NOW WHAT!!!!!  Inside the room, she told me to change into a purple dress that had been left there for me (for anyone who hasn't read the books, Anna's favorite dress is purple).  On the box of shoes that were also left was a note saying: "Put this on and meet me at home. -Mr. Grey".  Then I got to thinking, maybe he is taking me to Seattle ;)  I put the dress on and Jaime and I headed back to our house.

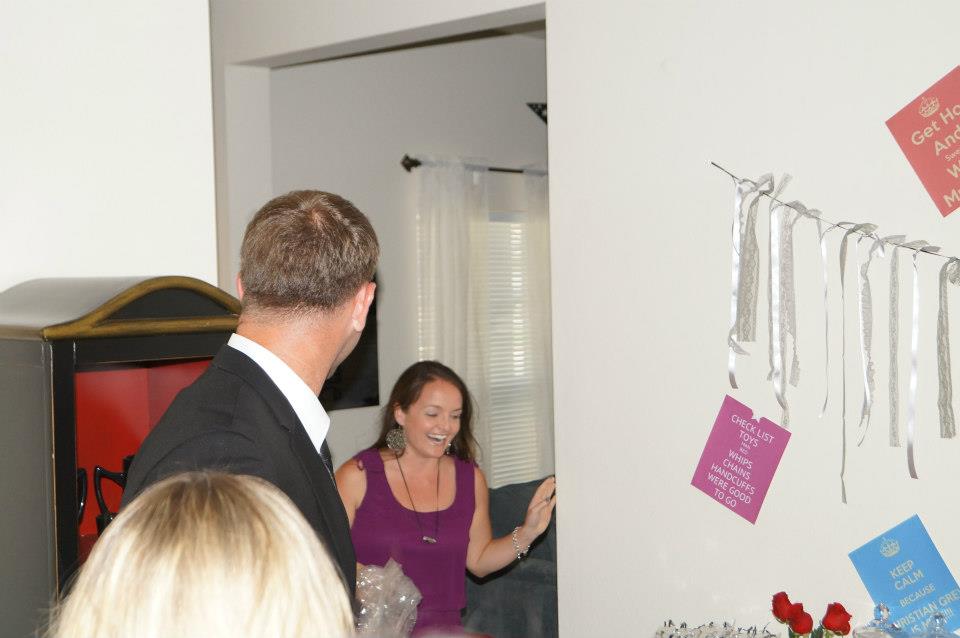
When we got back to the house, I did suspiciously look around to see if there were any cars I recognized haha.  There weren't of course.  When I opened the door, to my surprise, a huge SURPRISE was shouted at me!!! 


It took me a while to take everything in.  There were all of my closest friends and family, wearing gray, in masks ready to celebrate my 30th.  As I looked around, I saw the vanilla and red velvet cupcakes, little wine with gray stripped straws, chocolate "keys to the playroom", submissive subs, sea salt chips, bow "tie me up" pasta!!! Everything I had envisioned for my own party was right in front of me and I didn't have to do any of the work!  It was fabulous!  My mom put together all the little details of the party, with help from my hubby, aunt and close friends as if she had been in my head!  I could not believe all the details and work that they had put into it!


We had a fabulous evening and I felt so special that I got to spend it with all my favorite people!  Hope you guys enjoy the pictures as much as I enjoyed telling you about the party :)

Until next time,
Lacey Cakes